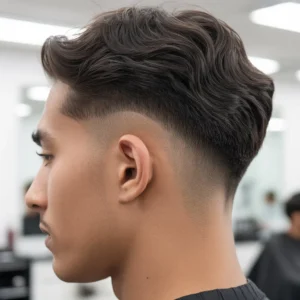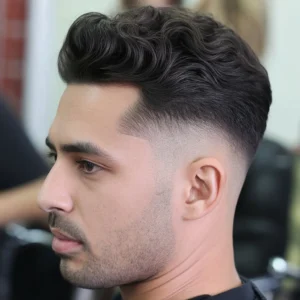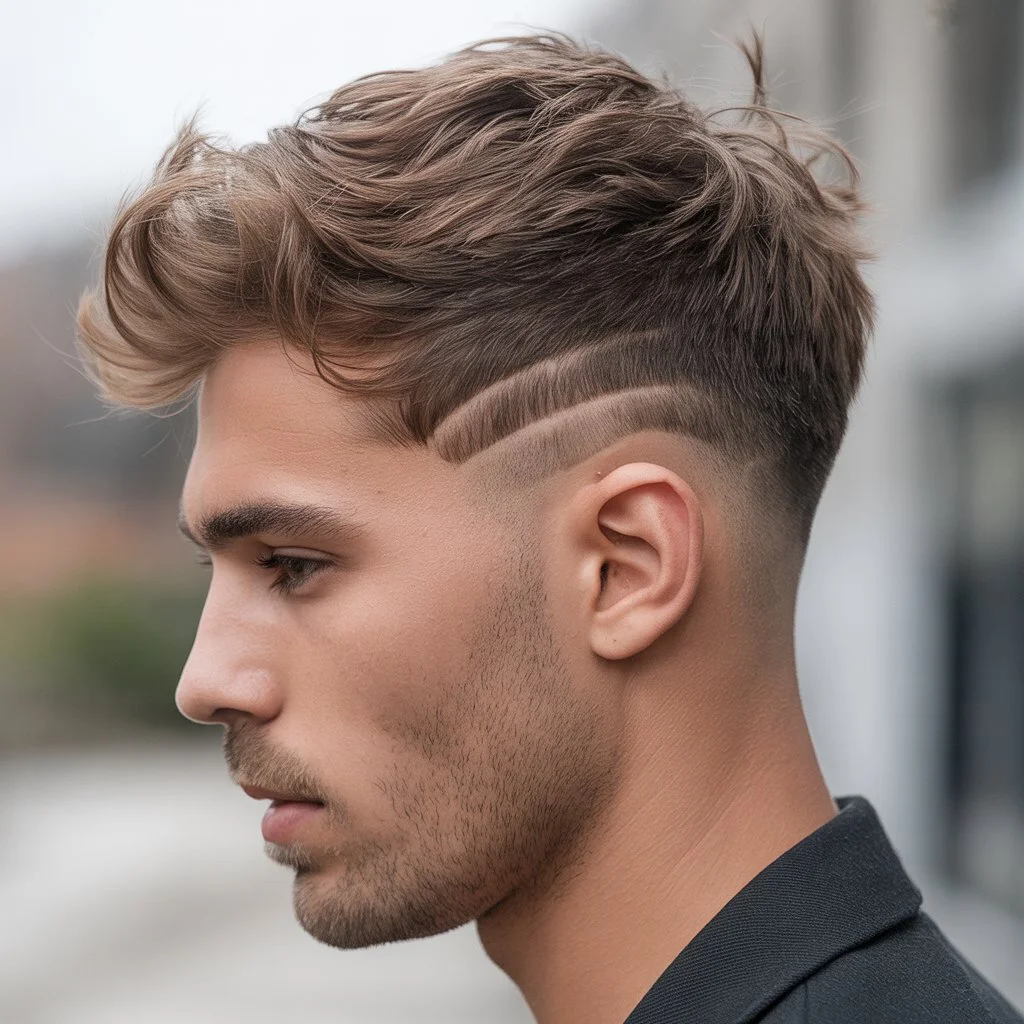
The Mid Taper Fade with Textured Fringe
The Definitive European Aesthetic: Mid Taper Fade Textured Fringe
Over the last five years, a massive shift has occurred in men’s grooming, moving away from slick, high-hold pompadours and stiff side-parts toward a more chaotic, effortless, forward-swept look. The pinnacle of this modern movement is the mid taper fade textured fringe. In this comprehensive masterclass, we will unpack exactly how this style became the definitive European aesthetic and how you can achieve it. By combining a relentlessly clean, mathematical drop on the sides via the taper, with a heavily manipulated, weightless, piecey fringe pushed forward over the forehead, you create a look defined by striking juxtaposition. The mid taper fade textured fringe requires advanced shear work to reduce weight on the top so it sits effortlessly without looking like a heavy, outdated bowl cut.
Understanding the Mechanics of the Textured Fringe
The “fringe” (or bangs) is the most critical element of this aesthetic, and it is also the easiest for an amateur barber to ruin. If a barber simply combs your hair forward and cuts it horizontally across the forehead, you will be left with a blunt, childhood bowl cut or a severe Roman Caesar look. The perfect mid taper fade textured fringe relies entirely on the deliberate destruction of blunt lines.
To achieve the correct look, the hair must be aggressively debulked. A master barber will use a combination of point-cutting (snipping vertically into the ends of the hair) and texturizing hair-cutting shears (scissors with teeth that only cut a fraction of the hair). This technique shatters the heavy weight line at the front of the head. It creates a jagged, uneven, “piecey” edge where strands of hair end at slightly different lengths. This exact unevenness is what allows the fringe to look chaotic, relaxed, and impossibly cool, rather than strict and heavily manicured.
The Synergy of the Mid Taper
So why pair this messy, forward-swept top with a mid taper instead of a high skin fade or a disconnected undercut? Because the mid taper fade textured fringe provides essential background structure and balance.
If you pair a messy fringe with a full, unkempt set of sides, you simply look disorganized and sloppy. If you pair it with a harsh, disconnected high skin fade, you drift into a very aggressive, militaristic aesthetic. The mid taper is the perfect middle ground. It cleans up the perimeter around the ears and neck so you still look professional in an office setting, but leaves enough dark shadow on the sides so the forward-sweeping top blends naturally into the silhouette instead of looking like a glued-on hairpiece. The mid taper visually anchors the chaos on top. It signals intention. It tells the world that the messy hair on your forehead is a deliberate, highly-styled choice.
Face Shape Compatibility
The mid taper fade textured fringe is incredibly versatile, but it interacts with different facial geometries in unique ways. Because the fringe covers the forehead, it physically shortens the face.
This makes it an absolute godsend for men with long, oblong, or diamond-shaped faces, as it balances the proportions perfectly. For men with rounder faces, the fringe should be kept slightly shorter and highly textured to avoid making the face look circular. If you want to confirm that this forward-swept look is ideal for your specific bone structure, run your details through our interactive fade calculator before your next appointment.
Advanced Customization: Adding Surgical Lines
Because the mid taper fade textured fringe contrasts a messy top with clean sides, it serves as an incredible canvas for razor detailing. Many men elevate this European aesthetic by asking their barber to carve surgical lines—one or two parallel razor slashes—directly into the dark shadow of the mid taper, right above the ear.
These surgical lines add an immediate edge of bespoke tailoring and streetwear influence to the haircut. It breaks up the gradient of the fade and draws the eye directly to the precision of the barber’s straight-razor work, contrasting beautifully with the matte, choppy fringe above it.
Styling the Chaos: Products and Techniques
The biggest mistake men make when trying to execute the mid taper fade textured fringe is using the wrong product. You must not use anything that binds the hair into a single, hard clump. Gels, heavy pomades, and thick waxes are absolutely forbidden. They will neutralize the texturizing work your barber just spent 20 minutes performing. The strategy is focused entirely on separation and volume. You want the hair to look dry, thick, and separated into hundreds of individual, piecey clumps.
The 3-Step Styling Protocol
- Step 1: The Foundation. Always start with semi-damp, towel-dried hair. Apply a generous amount of Sea Salt Spray. This provides the gritty, beach-like texture that roughs up the hair cuticle and makes individual strands repel slightly from one another, creating instant volume.
- Step 2: The Blow-Dry. You must blow-dry the hair forward. Point the nozzle of the hairdryer from the crown of your head down toward your nose. Use your fingers—absolutely no combs or brushes—to roughly shake the hair from side to side as you blow-dry it over your forehead. This locks the sea salt spray in and establishes the messy, forward-flowing direction.
- Step 3: The Finish. Once 100% dry, you need a friction product. The absolute best choice for a mid taper fade textured fringe is a Styling Powder. Dust the powder directly into the roots at the top of your head and lightly at the fringe. Vigorously rub your hands against your scalp to activate the powder. It provides an invisible, matte, high-friction hold that keeps the texture looking chunky and separated all day long without any heavy shine. Alternatively, a very dry, lightweight matte clay can be used in tiny amounts to pinch and define individual strands on the forehead.
Managing Expectations and Maintenance
The mid taper fade textured fringe is phenomenally forgiving when it comes to the top canopy. Because the fringe is intentionally jagged and messy, as it grows out over a month or two, it simply looks like a longer version of the same cool, chaotic style. You only need to have the top textured and trimmed every 6 to 8 weeks. Just be sure to hydrate the ends properly using a routine from our natural hair care guide to prevent the fringe from looking frizzy.
However, the mid taper framing the sides requires standard upkeep. To keep the look intentional and prevent it from crossing the line into looking unkempt, you should schedule a taper touch-up for the sides, neckline, and surgical lines every three weeks. Keeping the perimeter tight is the entire secret to making a messy fringe look expensive, tailored, and undeniably premium.
Looking to explore other variations?
Check out our guide to the The Best Mid Taper Fade Thick Hair Style (Ultimate Guide), explore the Best Zero Mid Taper Fade: Ultimate Skin-Tight Guide (2026), or switch it up completely with the 7 Tips for the Perfect Burst Fade for Coily Hair (Guide).
Written by The Master Barber
With over a decade of high-end editorial grooming experience, our team breaks down complex barbering geometry into actionable styling advice for the modern man.